Build a File Server with Samba
- EN
- JA
Table of Contents
In this article, we use Samba to build a file server that can be accessed from Windows.
#
Introduction
For the server hardware, GMKtec’s NucBox M5 Plus was selected.
Since Debian is installed on the mini PC, Samba is installed there to build the file server.
When installing Debian from scratch, also see Install Debian.
#
Install Samba
Install Samba with apt.
sudo apt install samba
The Samba installation is complete. Dependencies are installed automatically.
#
Create a Partition
Create a partition on the disk where you want to create the shared folder. First, check the list of disks with lsblk.
kaito@file:~$ lsblk
NAME   MAJ:MIN RM   SIZE RO TYPE MOUNTPOINTS
sda      8:0    0    32G  0 disk
|-sda1   8:1    0    31G  0 part /
|-sda2   8:2    0     1K  0 part
`-sda5   8:5    0   975M  0 part [SWAP]
sdb      8:16   0 931.5G  0 disk
sr0     11:0    1  1024M  0 rom
sdb is the disk on which the shared folder is created. Create a partition on sdb with fdisk.
kaito@file:~$ sudo fdisk /dev/sdb

Welcome to fdisk (util-linux 2.38.1).
Changes will remain in memory only, until you decide to write them.
Be careful before using the write command.

Device does not contain a recognized partition table.
Created a new DOS (MBR) disklabel with disk identifier 0x278ce66c.

Command (m for help): n
Partition type
   p   primary (0 primary, 0 extended, 4 free)
   e   extended (container for logical partitions)
Select (default p):

Using default response p.
Partition number (1-4, default 1):
First sector (2048-1953525167, default 2048):
Last sector, +/-sectors or +/-size{K,M,G,T,P} (2048-1953525167, default 1953525167):

Created a new partition 1 of type 'Linux' and of size 931.5 GiB.

Command (m for help): w
The partition table has been altered.
Calling ioctl() to re-read partition table.
Syncing disks.
Run lsblk again to confirm that the partition was created.
kaito@file:~$ lsblk
NAME   MAJ:MIN RM   SIZE RO TYPE MOUNTPOINTS
sda      8:0    0    32G  0 disk
|-sda1   8:1    0    31G  0 part /
|-sda2   8:2    0     1K  0 part
`-sda5   8:5    0   975M  0 part [SWAP]
sdb      8:16   0 931.5G  0 disk
`-sdb1   8:17   0 931.5G  0 part
sr0     11:0    1  1024M  0 rom
The sdb1 partition has been added. Next, create a file system on this partition.
#
Create a File System
Use mkfs to create an Ext4 file system on the sdb1 partition created earlier.
kaito@file:~$ sudo mkfs -t ext4 /dev/sdb1
mke2fs 1.47.0 (5-Feb-2023)
Discarding device blocks: done
Creating filesystem with 244190390 4k blocks and 61054976 inodes
Filesystem UUID: 2cc13138-06d1-4c28-ae9f-fc126067921a
Superblock backups stored on blocks:
        32768, 98304, 163840, 229376, 294912, 819200, 884736, 1605632, 2654208,
        4096000, 7962624, 11239424, 20480000, 23887872, 71663616, 78675968,
        102400000, 214990848

Allocating group tables: done
Writing inode tables: done
Creating journal (262144 blocks): done
Writing superblocks and filesystem accounting information: done
The file system has been created.
#
Mount the File System
First, check the UUID of the disk partition by running ls -l /dev/disk/by-uuid/.
kaito@file:~$ ls -l /dev/disk/by-uuid/
total 0
lrwxrwxrwx 1 root root 10 Apr 20 01:05 2cc13138-06d1-4c28-ae9f-fc126067921a -> ../../sdb1
lrwxrwxrwx 1 root root 10 Apr 20 00:57 6ee6b083-0585-45dd-b3d2-2add948dd8f3 -> ../../sda1
lrwxrwxrwx 1 root root 10 Apr 20 00:57 837625f1-5be2-4aed-9a8a-cbac1e7c29cc -> ../../sda5
This command lists symbolic links that identify each disk partition by UUID. The UUID of the partition to mount is 2cc13138-06d1-4c28-ae9f-fc126067921a.
Create the directory where the partition will be mounted. In this example, /srv/share is created.
sudo mkdir /srv/share
Configure the file system created earlier to be mounted automatically in this directory.
Automatic mounting is configured in /etc/fstab. Open the file in a text editor and change the settings. The following is an example.
# <file system> <mount point> <type> <options> <dump> <pass>
UUID=2cc13138-06d1-4c28-ae9f-fc126067921a /srv/share ext4 defaults,nofail 0 2
The settings are divided into six fields separated by spaces.
- file system
The file system to mount. - mount point
The directory where the file system is mounted. - type
The type of file system to mount, such as ext4 or btrfs. - options
Mount options for the file system. Some file systems have specific settings. - dump
Specifies whether the file system is backed up by thedumpcommand.1includes it in backups, and0excludes it. - pass
Specifies the order in whichfsckchecks the file systems at boot.1has the highest priority and is required for the root file system. Use2for other file systems.0disables checking.
After changing the settings, mount the file system with the following commands.
sudo systemctl daemon-reload
sudo mount -a
The file system is mounted according to /etc/fstab. Confirm that it was mounted with the df command.
kaito@file:~$ df -h
Filesystem      Size  Used Avail Use% Mounted on
udev            462M     0  462M   0% /dev
tmpfs            97M  1.9M   95M   2% /run
/dev/sda1        31G  1.8G   28G   7% /
tmpfs           481M     0  481M   0% /dev/shm
tmpfs           5.0M     0  5.0M   0% /run/lock
tmpfs            97M     0   97M   0% /run/user/1000
/dev/sdb1       916G   28K  870G   1% /srv/share
The file system is mounted. Automatic mounting is now configured.
#
Create a Group for Shared Folder Access
In this example, the file server is configured so that only users belonging to a specific group can access the shared folder.
Create a group named share and add users who should be allowed to access the shared folder.
sudo groupadd share
After creating the group, change the owning group and permissions of the shared folder. This allows only users belonging to the specific group to access it.
sudo chown root:share /srv/share
sudo chmod 2770 /srv/share
The owning group and permissions have been changed.
#
Edit the Samba Configuration File
Edit Samba’s /etc/samba/smb.conf configuration file as follows.
[global]
server role = standalone
security = user
log file = /var/log/samba/log.%m
max log size = 1000
logging = file
panic action = /usr/share/samba/panic-action %d

[share]
path = /srv/share
read only = no
create mask = 0660
directory mask = 0770
Save the file and restart Samba by running sudo systemctl restart smbd.
#
Add a User for Shared Folder Access
Create a user who can connect to the file server and add the user to the share group.
sudo useradd user
sudo usermod -aG share user
A user named user has been created. Add the user to the database with pdbedit. You are prompted to enter the password used to log in to the file server.
kaito@file:~$ sudo pdbedit -a user
new password: <file-server-login-password>
retype new password: <file-server-login-password>
Unix username:        user
NT username:
Account Flags:        [U          ]
User SID:             S-1-5-21-1396205738-3650286879-311231574-1001
Primary Group SID:    S-1-5-21-1396205738-3650286879-311231574-513
Full Name:
Home Directory:       \\FILE\user
HomeDir Drive:
Logon Script:
Profile Path:         \\FILE\user\profile
Domain:               FILE
Account desc:
Workstations:
Munged dial:
Logon time:           0
Logoff time:          Thu, 07 Feb 2036 00:06:39 JST
Kickoff time:         Thu, 07 Feb 2036 00:06:39 JST
Password last set:    Sun, 20 Apr 2025 01:57:46 JST
Password can change:  Sun, 20 Apr 2025 01:57:46 JST
Password must change: never
Last bad password   : 0
Bad password count  : 0
Logon hours         : FFFFFFFFFFFFFFFFFFFFFFFFFFFFFFFFFFFFFFFFFF
The user has been added.
The required configuration is complete. Finally, access the shared folder from a client PC.
#
Access the Shared Folder
Access the shared folder created with Samba from Windows File Explorer.
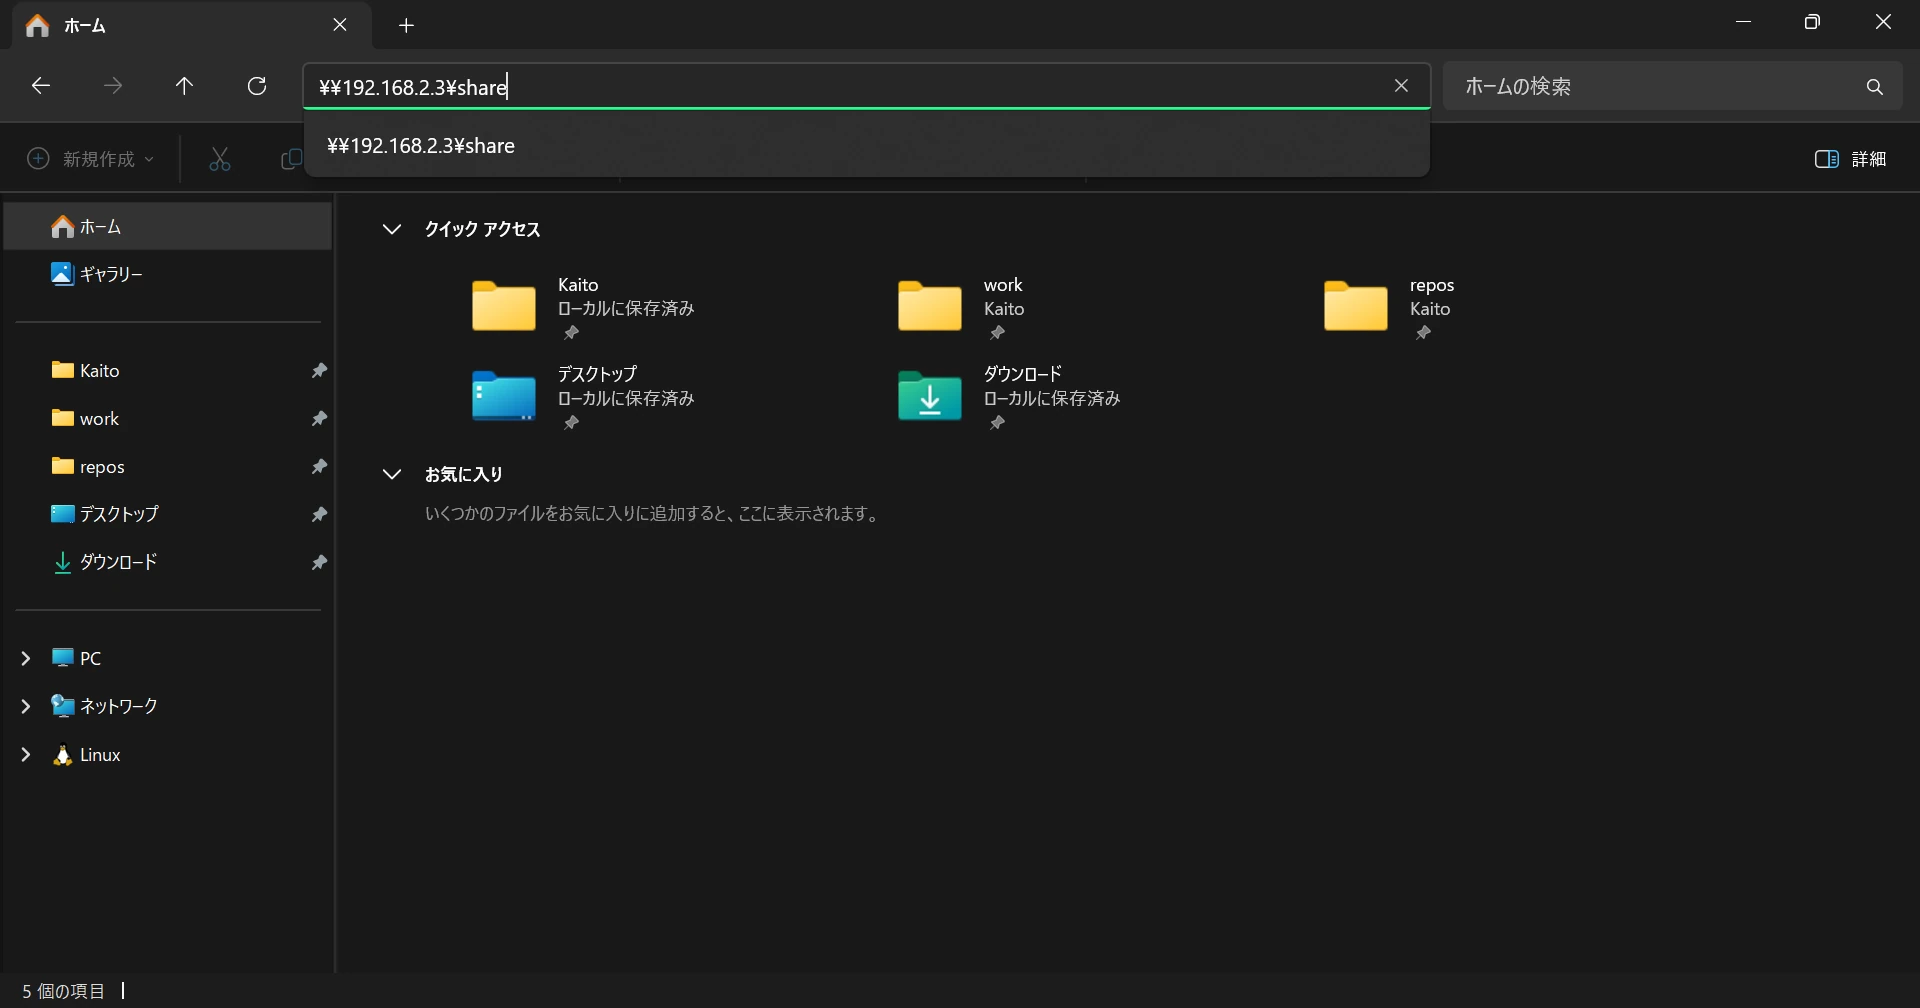
Enter the path to the shared folder in the field at the top of the window.
\\<server-IP-address>\<shared-folder>
You are prompted to enter network credentials.
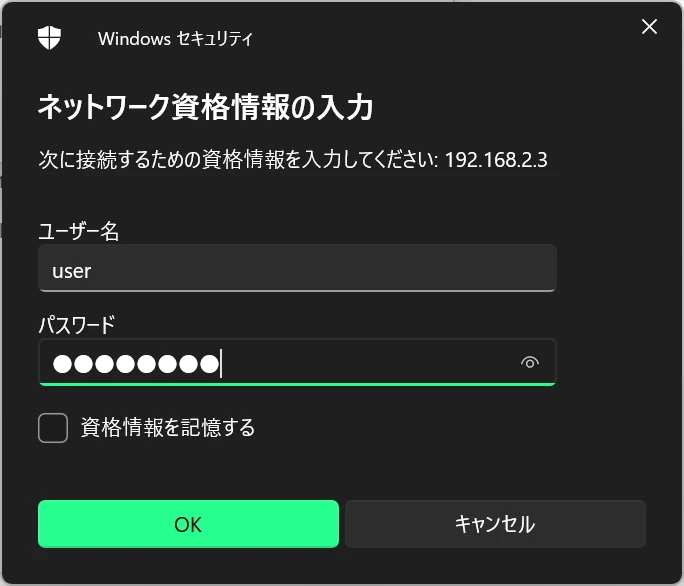
Enter the username and password of the user created in Samba, then select OK.
If the username and password of the user logged in on the client PC match those of the user created in Samba, entering credentials is skipped.
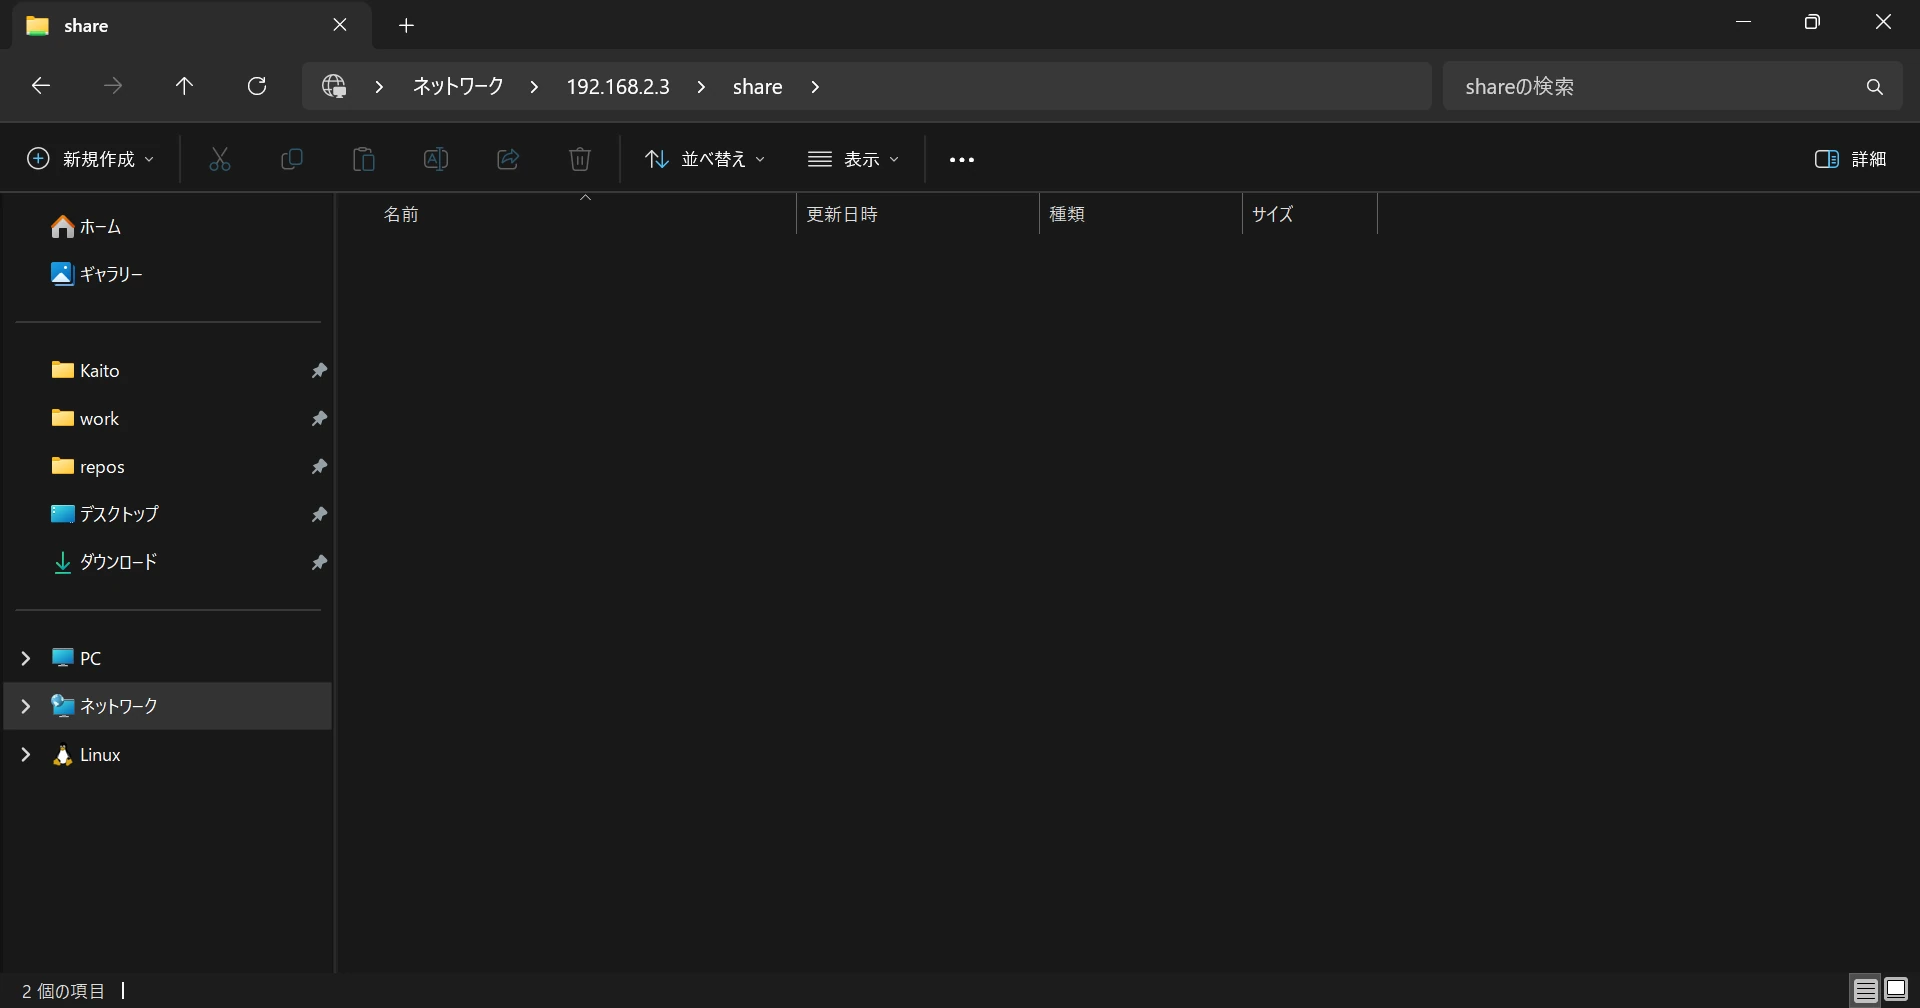
The shared folder can now be accessed. The Samba file server setup is complete.